Dec 31
Medeco M3 and M3 BiLevel Mortise – Factory Cutaways
Update: Some errors were made in this article, please see the end for the corrections.
The Medeco M3 is Medeco’s latest commercial cylinder and was released as a replacement for the Medeco Biaxial. They released both the M3 and the lesser known M3 BiLevel (M3B for short) at the same time. On the surface both look surprisingly similar, and even with factory cutaways it may not be immediately apparent what the difference is. We will explore the workings of the M3 and M3B and see what they bring to the table beyond the Biaxial in terms of security and features. In addition we will take a look to see why the beefy looking M3 BiLevel may not give you much more security than the Kwikset on your front door.
To make things easier to follow I want to setup some standards for this write up. First of all when I am talking about the M3 Standard cylinder I will refer to it as M3S (S for standard) and when I am talking about the BiLevel I will call it the M3B. For all the pictures I show I will always have the M3B on the left and the M3S on the right, if only one picture is shown it is safe to assume that feature is the same on both the M3S and M3B. In addition beware that while both are 6 pin cylinders the cutaway only shows the first 5 pins. I would also like to thank Jon King a lock picker and something of a Medeco specialist (including picking the M3S) for reviewing the technical details of this article.
The Medeco M3S was primarily created to replace the Biaxial when the patent protecting the Biaxial keys ran out. To extend the patent they added a slider to the lock for added security and once again were able to offer a cylinder with patented keys (meaning authorization is required to duplicate keys). In addition the M3B was a new type of cylinder from Medeco, a cheaper cylinder (list of $40-70 depending on features), that took the same key as the M3S and was intended to protect things that don’t need protection. The documentation for the M3B says it best “BiLevel’s patented standard locks offer the appropriate level of security for conference rooms, maintenance closets, break rooms, bathrooms and other areas without risk or valuables.”. Before we really dive into the pictures and breakdown I am going to say a bit about how the M3S and its predecessors work.
Aside from simply raising the pins to the sheer line like a standard cylinder, Medeco locks have always had an additional feature of requiring each of the pins to be rotated either left, right, or center (20 degree offset for L/R). This is accomplished by having a vertical groove cut into each pin and fingers that stick out from the sidebar. When the proper key is inserted and the pins are rotated all the grooves face the sidebar and the fingers (5 for 5 pin 6 for 6 pin) on the sidebar are able to push into these grooves. The Biaxial was the first patent extender on this, it added the fact that each pin could be either a fore pin or an aft pin (front or back). While this didn’t make it harder to pick it did add a lot more possible key combinations allowing for greater master keying. Finally the M3 came along and added a slider, the slider must be pushed in just the right amount to allow the two fingers on it to enter into the two holes on the sidebar to allow the sidebar to move in. Confused? Great! It will become more clear as we go through the actual workings. The M3 BiLevel is really more similar to the Medeco KeyMark than the other Medeco lines. Both are basically standard cylinders with patented key control, but do not offer much in the way of security. So lets start looking at these cylinders.
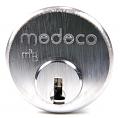
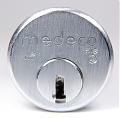
We can see the front of the M3B has a B on it for BiLevel but the other difference we can notice when compared to the old Biaxials is a much larger and fairly open (free of wards) keyway. This doesn’t mean much for a usability perspective but does mean it is easier for a lock picker to insert tools into the cylinder.


Looking at the key from the top we can see the angle cuts and also that the valleys are not equally spaced apart (due to the fore/aft positioning of pins). Look at the side of the key we can see the slider cut to the proper length.
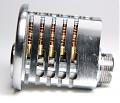
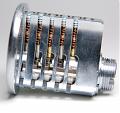
As we look at the cutaway side of the cylinder you may be able to make out the mushroom security pin (2nd chamber on M3B and 3rd on M3S). You should definitely be able to see the silver color of some of the M3S pins, those are the hardened anti-drill pins. We also get a shot of the sidebar on both of these cylinders. In addition if you look at the stack heights (top pin height + bottom pin height) they are basically equal on both cylinders. This ensures equal spring pressure so one could not use the amount of pressure being exerted by a pin to determine its length (it also makes the cylinder much more annoying to pin/rekey due to the fact you must adjust the top and bottom pins).


Once the key is inserted we can see the pins all raised to the sheer line. In addition on the M3S with the 3 bottom pins we are able to see their grooves all pointing out, this is to allow the sidebar fingers (not visible) to push into them.
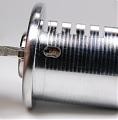
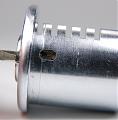
Here we can see where the metal has been cut away to allow you to see the slider moving. If you look closely you will notice one slider is a bit farther in than the other (just due to different key slider cuts for the M3B and M3S) however the slider mechanisms themselves are the exact same for both.


Now we are getting to some real action shots! Here the key is rotated partially to allow a look at the bottom pins. On the M3B the bottom pins look pretty much like standard pins, in addition you can also see the sidebar (if you look carefully you will not see any fingers). On the M3S there is much more to see. First of all we can see each of the pins has a hardened anti-drill pin in their center for anti-drill protection. In addition we can see all the grooves are going in the same direction on the pins (note the nubs at the top of each pin may look like a groove but is not, we will discuss them later). If you look carefully at the sidebar you can actually see the fingers for 3 of the pins sticking out (will really need to zoom for that one).


Further rotation shows us the slider, again on both of them it is the exact same hardware/action.

Now we need to take it apart, the Medeco cylinders are very nice in that these use hex screws at the top of each pin chamber(instead of a bible cap) making for easier repinning than normal. We can remove these screws and carefully remove the springs and pins, make sure to keep them in order and right side up as it matters (right side up can be figured out later). Once you remove the pins the cylinders will still not turn even if tension is applied, this is due to the sidebar/slider. The sidebar cannot move in unless the slider is pushed in the proper amount. To see how much security is added by the slider apply tension to the cylinder and slowly push forward the slider with a paperclip or small screwdriver, once it reaches the proper amount the sidebar should go in and the plug turn. It isn’t quite that easy while picking, but its close.
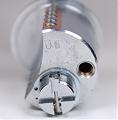
Now while Medeco makes it really easy to repin from the top, taking the cylinder completely apart they made lifetimes harder (at-least on these cutaways). If you look at the picture above of the back of the cylinder you will notice a C clip on the back of the plug. Technically this is more like an O clip with a small break in it:) To make things worse this sits in a groove to prevent movement. Overall it is exceptionally hard to get off, it took me 20+ minutes the first time I tried. The best method I have found is to try and get it completely out of the groove and then it is fairly easy to get off. To do this I used small screwdrivers to pry one side up a bit, then used another screwdriver to slowly go around prying it up until I reached the other side, at which point i used a screw driver to pry this up some, and presto i was out of the groove (a good 5-10 minutes after). I broke a mini screwdriver doing this, and doing it without damaging the clip is another trick. You also may notice the pin in the back of the plug, this will come out once the C-clip is removed, and is there to prevent anything from coming out the back of the plug (can you say Adam Write Wires or a screwdriver!).

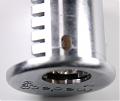
It is important to be careful while removing the plug from the cylinder (remember to put the key in, or manually bypass the slider to get it to remove easily). Both the slider and the sidebar have small springs (two for the sidebar one for the slider) and losing these is very annoying (and somewhat hard to replace). You may notice when taking the M3S apart that two crescent shaped pieces of metal fall out too, these are located at the front of the cylinder (see the picture on the right above for where one goes, the other goes next to it on the side). These metal crescents are hardened steel to further prevent drilling.


This is the pin breakdown for both of the cylinders note the odd black color of the M3B bottom pins. As we can see the M3B pins are just like standard cylinder pins, and are not effect at all by the angles on M3 keys.


On the left we have a mushroom top pin (found in both the M3B and M3S), it is a true mushroom pin and not just a spool pin as they frequently are. Mushroom pins are used to try and prevent picking by causing the pin to false set on the sheer line. On the right we have one of the hardened top pins from the M3S.


On the left here we have one of the more interesting M3B bottom pins. It has a groove through the middle of it which we can only surmise is an anti-pick groove. Frequently bottom pins may be serrated (American 5200’s) or have a groove similar to this but normally more towards the top of the pin. It is very odd to have the anti-pick groove where it is, especially as the M3B is not said to have increased pick resistance (and would require some heavy over-setting to be effective) but it is the only function we can figure out for it. In the center we have a standard M3S bottom pin, it is cut on an angle and has the groove running straight through the side of it for a finger from the sidebar. Finally on the right we have the M3S bottom pin from another angle showing the metal nub mentioned earlier.
![]()
![]()
Here we have the two sidebars. Both sidebars have two notches in them, these notches are what the two finger pins from the slider are able to enter. The rest of the M3B slider is fairly basic, just the two springs, the M3S slider however features the 6 fingers that go into each of the respective pins (ensuring they are rotated the proper amount).
![]()
![]()
This is the side of each of the plugs respectively, where the sidebar goes. The M3B plug has the slider in it showing the two fingers sticking up into where the sidebar goes. If you look at the M3S plug you can see the 6 slots the fingers go through to reach the pins, if the slider was in the M3S it would also have the two fingers for the slider sticking up.

This is a top view of the M3S plug as you can see at the very front of the plug are 3 metal rods, these are anti-drill rods to protect the plug from drilling.


This is the slider, it is the same in the M3S and M3B and it is just showing it from two different angles. You can see the two fingers which stick up into the sidebar and must be aligned into the holes in the sidebar to allow it to enter the plug.


Here we can see the sidebar just resting out of both plugs. On the M3S you can see see the fingers sticking out.

This is with the M3S sidebar pushed into the cylinder if you look closely you can see the finger pins now protruding into each of the pin chambers.

Here we have a shot of the bottom of the M3S plug (you can see the fingers again here) which is where the slider is on both plugs. As you can see there is a gap above the two notches in the sidebar where the slider fingers can move before the sidebar is pushed into the cylinder.

Once the sidebar is compressed you can see there is only the two holes for the slider fingers. If the slider is not pushed in the right amount the sidebar cannot move into the plug as the holes will not line up with the fingers on the slider.
![]()
Here is a shot of the key in the M3S plug with the bottom pins in place. It is easy to see all the grooves lining up and you can see the nub on the top of each pin. The metal nub is basically used to ensure the pin does not rotate too much or else the key cuts would not be able to properly set it. As you can see the nub sits in a small gap which allows it to rotate 20 degrees from the center both ways.
That concludes the breakdown of the cylinders, so lets take a moment to reflect on what we have seen. First of all we know the M3B is basically the same as a normal cylinder with the addition of the slider (the sidebar is also new but is fully controlled by the slider). This means that once you pick it like a normal cylinder you simply must slowly push the slider in while applying tension to get it to open. As the slider doesn’t add much protection one may think the M3B is actually easier to pick then a standard Kwikset of Schlage due to the wide open keyway. This is certainly partially true, however Medeco cylinders still are generally manufactured to tighter tolerances and do have two security pins in there, so it is still a hard pick. Does this warrant the $40-70 list price? Maybe, maybe not. You still get key control with the M3B and the ability to use the same keys for the M3B as you do with the M3S (good in mass deployments). If you are going for anti-pick/drill ability your money is certainly much better spent on something like a Scorpion which can sell for roughly the same price.
Now onto the M3S, and how it stacks up against its cheaper predecessor the Biaxial. From a picking point of view if you can pick a Biaxial (which is no easy feat on its own) the M3S will be no harder as the slider simply means once you are done with your normal picking you must push it into place. Some may say it is easier to pick the M3S due to the more open keyway when compared to most Biaxials. Don’t forget that while most locksmiths won’t willy nilly duplicate biaxial keys if you want true key duplication protection you should upgrade/buy the M3S.
As long as you understand the M3B’s intended purpose (protecting nothing valuable but allowing the same key as the M3S to be used) and understand that security wise the M3S offers very little on top of the Biaxial (with the M3B being far worse obviously), you can make informed decisions about your lock needs.
Corrections
Recently Han Fey supplied some additional information in respect to this article. Most importantly is regard to the groove I spoke about on some of the M3 BiLevel bottom pins:

Originally I stated that this was an anti-pick pin (similar to other serrated bottom pins) however the groove was too wide and low for a normal serrated pin, but no other purpose could be deduced. Han Fey clarified their purpose: They are not to prevent picking but rather to stop decoding. John Falle of Falle-Safe Securities makes several high security tools, including a standard pin tumbler decoder. Most standard pin tumbler locks can be decoded by this tool and while I will not go into details on the tool, it is available to normal commercial locksmiths. Medeco has taken the time to add this ‘falle groove’ to their BiLevel pins to make the BiLevel stand out from other standard pin tumblers. If you look at all of the pins with this groove you will notice they are all equal distant from the bottom of the pin:

The second issue Han explained was that the BiLevel did not actually start with the M3. For clarification, for the entire article up until this point, when I talked about the BiLevel, I was talking about the M3 BiLevel. I had heard in the past that over seas the Biaxial had been called the BiLevel, this was not completely correct. The original BiLevel is actually a very interesting modified Biaxial. Some of the bottom pins are replaced with a special rounded pin (instead of a chiseled standard pin). This rounded pin required the key to be cut by a special machine that can cut in 3D (if you consider the normal Biaxial key cutters 2D cutters). This obviously greatly reduces the chance of key duplication and makes some other attacks harder. This is not an article on the original BiLevel (although at some point on the future I may write one), however if you are looking for more information I was able to find some online at: http://www.medeco.dk/dwnload/Bilevel_brochure.pdf (See page 5 for a picture of the pin and key). The original BiLevel obviously is of no relation to the M3 BiLevel, the original BiLevel may have been sold under another name in the US (if you know it please let me know).
I would like to thank Han Fey for providing the corrections and additional details.
8 comments8 Comments so far
Leave a comment


Great write-up Mitch! Keep them coming! So am I correct when I say, that the way to bypass the sidebar on the M3B is to just pick it normally, and then push in the slider?
Yep Doug, pick all of the pins to the sheer line and then just move the slider forward slowly while applying tension. You can’t really apply too much tension as long as the slider moves, as soon as its fingers line up with the holes you are golden.
Wow, very impressive !
This clears up some things about the m3 and the m3b, very nice site !
Good luck on your upcoming articles !
Best of luck !
Hi I was wandering if you sell cutaways of medecos I am a learning locksmith right now and have been in contact with Jon king about making some tools to assist in picking the lock and feel it would be easier if I could visually see what is happening Hi my name is Corey I owned my first set of professional lockpicks when I was 12 yrs old pro-loc it was all I wanted for my birthday somehow he made it happen and purchased me a different lock each month I am now 24 and I am learning the trade from a locksmith in Summersville wv he has given me several challenges and I have completed all of the tasks except the medeco rim cylinder m3 he handed me. He fooled me one day said watch this and picked in seconds he had taken out pins night before and swapped for normal pins to make me think he was good. He said if I can get it open he will finally hire me, even if he is joking I would like to show him up. How much would u consider selling all three tools for. I can pay you directly thru paypal my contact info is listed below please consider it and let me know the cost and I will send u my paypal info if it is a go.
Thank you, you are a locksport genius.
Corey Scott
NCPA Vice President
Pharmacy Class 2012
University of Charleston
2402 Kanawha Terrace # 104
St. Albans WV 25177
Phone: (636) 584-5078
Email: coreyscott@ucwv.edu
My family members always say that I am wasting my time here at net, but
I know I am getting knowledge everyday by reading thes
nice content.
I just got the Medeco m3 rim cylinder and BOY is it HARD to insert and remove the key.
Even if you just tighten the m3 rim cylinder into the door opening with the tailpiece hanging out the inside end without attaching the deadbolt assembly on the inside, and try using the key….if you’ve really tightened the cylinder, the key JAMS!!! what’s going on? this is ridiculous for such an expensive rim cylinder. I’m feeling disheartened at my choice.
G2GBET
Making The Cut – Mitch Capper
judi slot
Making The Cut – Mitch Capper